
How I made my first Enamel Pin | Behind the Scenes
- Making To Make Happy

- Feb 23, 2021
- 7 min read
When I first began to get involved in the art and making community, I was so blown away by the products people were making. Not just by how beautiful they were as products, but also that they were being made by people who seemed so normal. They were folks with a dream, just like me, but who had realised earlier on that dreams can be tangible if you make a start on them. Wow!
So I saw folks making pins and I wanted to do the same. But where would I even start?? If you are even a little like me - wanting to make a pin but not knowing how to begin - this blog is a rundown of how I made mine. I don't have all the answers, as this was my first attempt, but I hope it is helpful and gives you a foothold to explore further.
The Design
Ok, so first thing’s first. What do you want to make a pin of??
Think about the pins out there that attract you. Why are you drawn to them? Is it the colour, or the subject? Often, pins are focused little moments which celebrate something dear to you. You buy a pin to represent you in some way - it is a badge which showcases your hobbies, your colours, your obsessions, your dreams, your adventures.
Therefore, when you are planning your pin design, think about what you yourself would want to buy. Think about the message your design is conveying - if it taps into something people can identify with personally, you’ll be on to a winner.
I ummed and ahhed over this for quite some time, but when the right design came along I just felt it. It’s because I felt it that I took the plunge in the end. Up until that point I had had a few design ideas but none seemed like winners somehow (and that’s not to say they won’t be in future, but the timing for them felt off right then).
Along came Book Snuggler. My Book Snuggler began as a simple Procreate illustration I made for my Instagram. I was enjoying reading at the time, it was turning colder outside, and so the idea for cosying up with a good book was prevalent in my mind.
It had a nice response on there - not massive, (because my channel is only just growing), but the comments it received seemed enthusiastic. So it sat in my brain for a while, mulling the possibilities. Due to its simple line design, I felt it would be adaptable to becoming a pin, and I thought the message would be something other people could identify with.
The Type of Pin
There’s a few different pin types, so the next decision is which one do you want to create?
Wooden & Acrylic Pins
These pins utilise a printing process. Essentially you can have your design printed directly onto a piece of wood (which is cut to size) or “encased” in acrylic (which is a clear hard plastic). Due to the designs being digitally printed these pins can accommodate more detailed illustrations. The wooden pins are great as a more eco-friendly option too. Both of these options are more price-friendly for independent makers - I would definitely try them in future.
Hard & Soft Enamel Pins
So this is how I think of enamel pins…
Imagine you are creating an artwork out of liquid paint. If you just pour the paint onto a sheet of paper it will go everywhere. So you need some boundaries, so that when the paint goes down, it only colours the area you want it to.
Enamel pins work in this vein - the enamel is your “paint colour”. You create boundaries for the enamel with metal. You can choose which type of metal base you use (such as Nickel, Gold, Rose Gold etc). Essentially the line work of your art is the metal and the coloured areas of your art are the enamels. The colours are blocked in - as in, gradation is not achievable unless you use some sort of screen print over the top of it later. Due to the technical process it takes to make these, enamel pins are not cheap…but the finished article can be beautiful.
Soft enamel pins can be slightly more cost effective but they have a different finish. Whereas a hard enamel pin will have a smooth polished surface, soft enamel pins will have raised line work and the enamels will sink in a little. Soft enamel pins are less hard wearing than the hard enamels. It really depends on the finish and feel you think will suit your artwork that will determine which fits your needs.
I decided to go for a Hard Enamel Pin, as I wanted my pin to be hard wearing and I liked the shiny finish.
Finding a manufacturer
So here’s the big stumper… Which manufacturer do you try?
This was the scary bit for me. I felt overwhelmed because it is a lot of money to spend out and I wanted to feel a certain reassurance that the end product was going to be ok. I also had never made pin artwork before and was unsure of the formats required for submission.
Most of the more affordable pin manufacturers are in China and can often be found on websites such as Alibaba, but I felt intimidated and worried that I would pick the wrong one. I find it hard to ask anyone for recommendations, (the introvert in me hates bothering people), so I felt at sea amongst my research.
Eventually I heard the illustrator Emma Carpenter talking about her pins in one of her videos - she had used Made by Cooper to make hers, and as I had bought a pin from her myself, I knew the quality was really good.
Made by Cooper essentially acts as a middle man, checking your design work and doing all the liaison with a pin manufacturer. Because of this, their prices can be slightly more - which is why many small businesses will go direct to manufacturers - but for my first pin I felt I would be more comfortable using MBC, as they would make sure my design was prepped properly and I could feel reasonably confident that the quality would end up ok.
Prepping the illustration
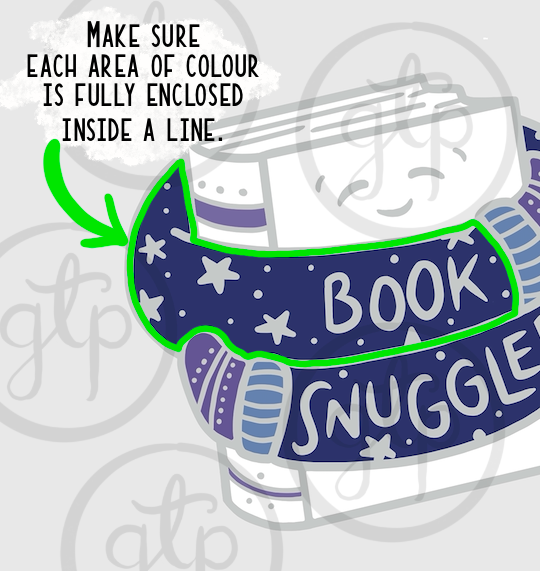
Hard enamel pins require a level of simplicity in their design, especially if they are small. Therefore I stripped my illustration back to its original line drawing. I zoomed right in and, using the Monoline brush in Procreate, I made sure all the line connections were smooth. I also made sure the lines were similar in thickness, and that none were too thin. Wherever one block of colour will be, the lines need to fully enclose it, so this was something I bore in mind too.
Enamel pins use the Pantone colour range - which means you can quote a reference number which corresponds to the colour you want, and you can feel certain the end colour will match pretty closely. However, if you do not have a program such as Illustrator, or a physical Pantone Colour Swatch Booklet, it can be tricky to figure out which colour reference you want. I used this website to find some colour codes, picked a few and hoped for the best!
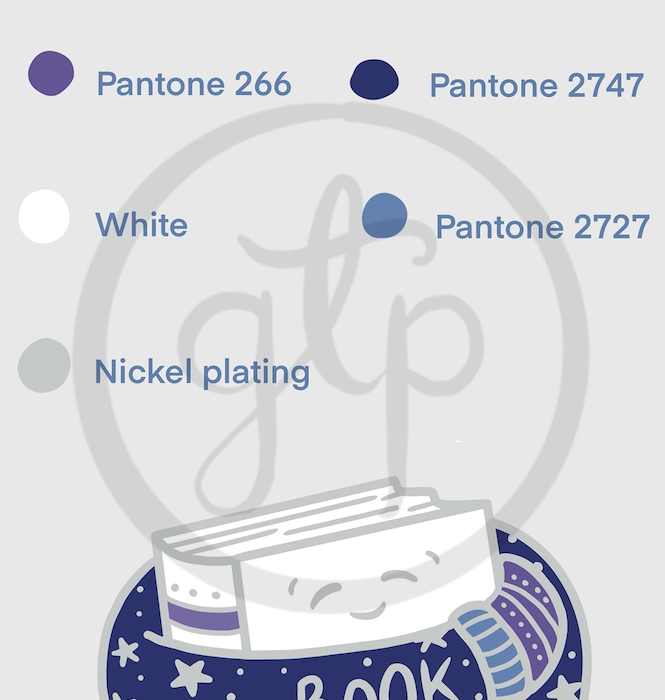
The maximum colours allowed for the price point I wanted were 4 - so I chose White, Dark Blue, Light Blue & Purple.
I created an image with my design on and swatched the colours above it, noting the colour codes I wanted with each one. I also noted the metal Nickel plating. This image is what I uploaded when I ordered my pins.
Ordering
I ordered a 4-colour, Nickel Plated, Metal Clutch, 30mm hard enamel pin. I only ordered 50 of them, as I was super scared no one would buy one! If ordering 20 had been an option I would have done it, but the price for so small a run was too high. 50 is still a very small run, and I certainly gain less of a profit from them, but I felt it was right for my first toe-dip in the pin-pool.
I also made use of MBC’s Free Backing Cards offer, which meant I would not need to order any separately. This just required submitting an image file of the correct size, much like with printing postcards.
Once ordered I awaited an email from the MBC team to approve my artwork. This took a few days and I found it in my Junk folder (so always check your spam if you don’t receive it!). I was provided a proof to check and it all looked just like my design so I approved it and had a little freak out. It was really happening!
Pins take about a month to process so I tried to forget about them and not worry. Right on time I received an email to say they were on the way, and my heart did a flipflop.
Long story shorter, they arrived and they all turned out fine! Phew! I also received so many backing cards - far more than the 50 I needed - so if I want to restock the pin later I’ll already have them to use.

Remember to count the pins on arrival and properly look at each one to check for faults. I only had one that had a veeeery slight nick in it and a couple with veeeery slight scratching….to be honest, they are so slight they are hardly noticeable, so eventually I may sell those with a little discount as seconds. I feel I got a really good quality batch though and I was super happy with them, but if you aren’t happy, do reach out to the company you’ve used and let them know.
I have to say, I am so proud of my Book Snuggler Pin. Every time I look at it, it reminds me that I took a leap of faith and it paid off.
If you have any questions about any of the above, do feel free to message me - I’m no expert but I’m happy to help! You can find me on Instagram @gemmathepen or you can email me via the Contact form on this website.
Taking the leap with such products as pins is a hard thing to do - but if you have an idea and you think it’s the right time to jump, think brave and go for it!
Keep making to make happy, friends!
Love Gem x


Comments